Using Public Clouds as data backends
Introduction
As stated in our GETTING STARTED guide, new data backends can be added by creating a region (also called location constraint) with the right endpoint and credentials. This section of the documentation shows you how to set up our currently supported public cloud backends:
For each public cloud backend, you will have to edit your CloudServer
locationConfig.json and do a few setup steps on the applicable public
cloud backend.
AWS S3 as a data backend
From the AWS S3 Console (or any AWS S3 CLI tool)
Create a bucket where you will host your data for this new location constraint. This bucket must have versioning enabled:
- This is an option you may choose to activate at step 2 of Bucket Creation in the Console;
- With AWS CLI, use
put-bucket-versioningfrom thes3apicommands on your bucket of choice; - Using other tools, please refer to your tool’s documentation.
In this example, our bucket will be named zenkobucket and has versioning
enabled.
From the CloudServer repository
locationConfig.json
Edit this file to add a new location constraint. This location constraint will contain the information for the AWS S3 bucket to which you will be writing your data whenever you create a CloudServer bucket in this location. There are a few configurable options here:
type: set toaws_s3to indicate this location constraint is writing data to AWS S3;legacyAwsBehavior: set totrueto indicate this region should behave like AWS S3us-east-1region, set tofalseto indicate this region should behave like any other AWS S3 region;bucketName: set to an existing bucket in your AWS S3 Account; this is the bucket in which your data will be stored for this location constraint;awsEndpoint: set to your bucket’s endpoint, usuallys3.amazonaws.com;bucketMatch: set totrueif you want your object name to be the same in your local bucket and your AWS S3 bucket; set tofalseif you want your object name to be of the form{{localBucketName}}/{{objectname}}in your AWS S3 hosted bucket;credentialsProfileandcredentialsare two ways to provide your AWS S3 credentials for that bucket, use only one of them :credentialsProfile: set to the profile name allowing you to access your AWS S3 bucket from your~/.aws/credentialsfile;credentials: set the two fields inside the object (accessKeyandsecretKey) to their respective values from your AWS credentials.
(...)
"aws-test": {
    "type": "aws_s3",
    "legacyAwsBehavior": true,
    "details": {
        "awsEndpoint": "s3.amazonaws.com",
        "bucketName": "zenkobucket",
        "bucketMatch": true,
        "credentialsProfile": "zenko"
    }
},
(...)
(...)
"aws-test": {
    "type": "aws_s3",
    "legacyAwsBehavior": true,
    "details": {
        "awsEndpoint": "s3.amazonaws.com",
        "bucketName": "zenkobucket",
        "bucketMatch": true,
        "credentials": {
            "accessKey": "WHDBFKILOSDDVF78NPMQ",
            "secretKey": "87hdfGCvDS+YYzefKLnjjZEYstOIuIjs/2X72eET"
        }
    }
},
(...)
Warning
If you set bucketMatch to true, we strongly advise that you
only have one local bucket per AWS S3 location.
Without bucketMatch set to false, your object names in your
AWS S3 bucket will not be prefixed with your Cloud Server bucket name. This
means that if you put an object foo to your CloudServer bucket
zenko1 and you then put a different foo to your CloudServer
bucket zenko2 and both zenko1 and zenko2 point to the
same AWS bucket, the second foo will overwrite the first foo.
~/.aws/credentials
Tip
If you explicitly set your accessKey and secretKey in the
credentials object of your aws_s3 location in your
locationConfig.json file, you may skip this section
Make sure your ~/.aws/credentials file has a profile matching the one
defined in your locationConfig.json. Following our previous example, it
would look like:
[zenko]
aws_access_key_id=WHDBFKILOSDDVF78NPMQ
aws_secret_access_key=87hdfGCvDS+YYzefKLnjjZEYstOIuIjs/2X72eET
Start the server with the ability to write to AWS S3
Inside the repository, once all the files have been edited, you should be able to start the server and start writing data to AWS S3 through CloudServer.
# Start the server locally
$> S3DATA=multiple yarn start
Run the server as a docker container with the ability to write to AWS S3
Tip
If you set the credentials object in your
locationConfig.json file, you don’t need to mount your
.aws/credentials file
Mount all the files that have been edited to override defaults, and do a standard Docker run; then you can start writing data to AWS S3 through CloudServer.
# Start the server in a Docker container
$> sudo docker run -d --name CloudServer \
-v $(pwd)/data:/usr/src/app/localData \
-v $(pwd)/metadata:/usr/src/app/localMetadata \
-v $(pwd)/locationConfig.json:/usr/src/app/locationConfig.json \
-v $(pwd)/conf/authdata.json:/usr/src/app/conf/authdata.json \
-v ~/.aws/credentials:/root/.aws/credentials \
-e S3DATA=multiple -e ENDPOINT=http://localhost -p 8000:8000 \
-d scality/cloudserver
Testing: put an object to AWS S3 using CloudServer
In order to start testing pushing to AWS S3, you will need to create a local
bucket in the AWS S3 location constraint - this local bucket will only store the
metadata locally, while both the data and any user metadata (x-amz-meta
headers sent with a PUT object, and tags) will be stored on AWS S3.
This example is based on all our previous steps.
# Create a local bucket storing data in AWS S3
$> s3cmd --host=127.0.0.1:8000 mb s3://zenkobucket --region=aws-test
# Put an object to AWS S3, and store the metadata locally
$> s3cmd --host=127.0.0.1:8000 put /etc/hosts s3://zenkobucket/testput
 upload: '/etc/hosts' -> 's3://zenkobucket/testput'  [1 of 1]
  330 of 330   100% in    0s   380.87 B/s  done
# List locally to check you have the metadata
$> s3cmd --host=127.0.0.1:8000 ls s3://zenkobucket
 2017-10-23 10:26       330   s3://zenkobucket/testput
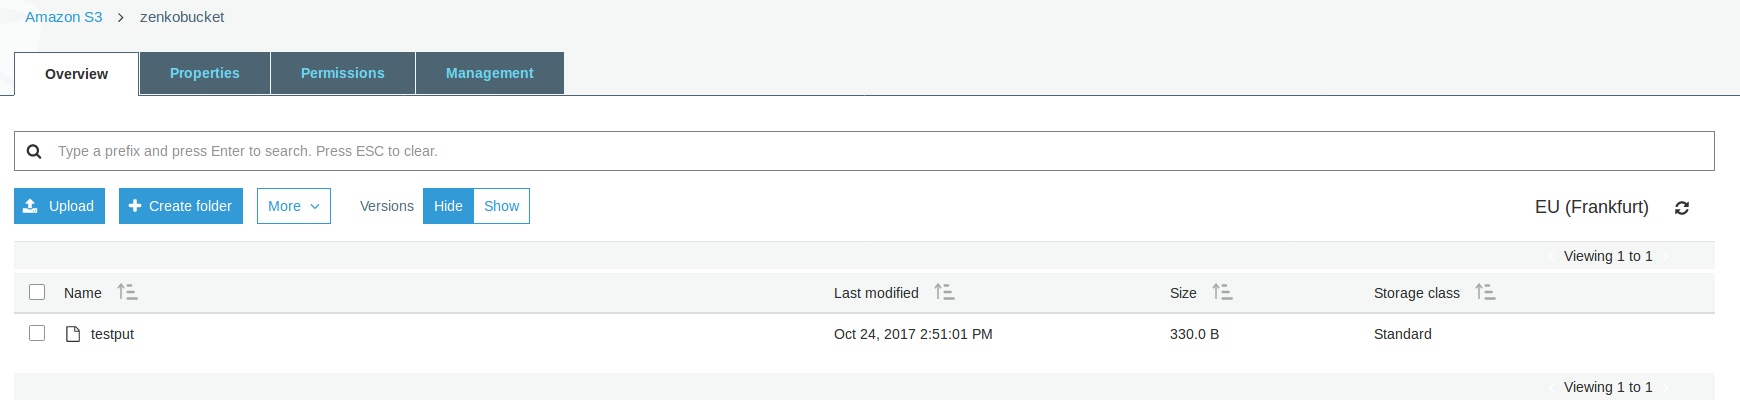
Then, from the AWS Console, if you go into your bucket, you should see your newly uploaded object:
Troubleshooting
Make sure your ~/.s3cfg file has credentials matching your local
CloudServer credentials defined in conf/authdata.json. By default, the
access key is accessKey1 and the secret key is verySecretKey1.
For more informations, refer to our template ~/.s3cfg .
Pre-existing objects in your AWS S3 hosted bucket can unfortunately not be accessed by CloudServer at this time.
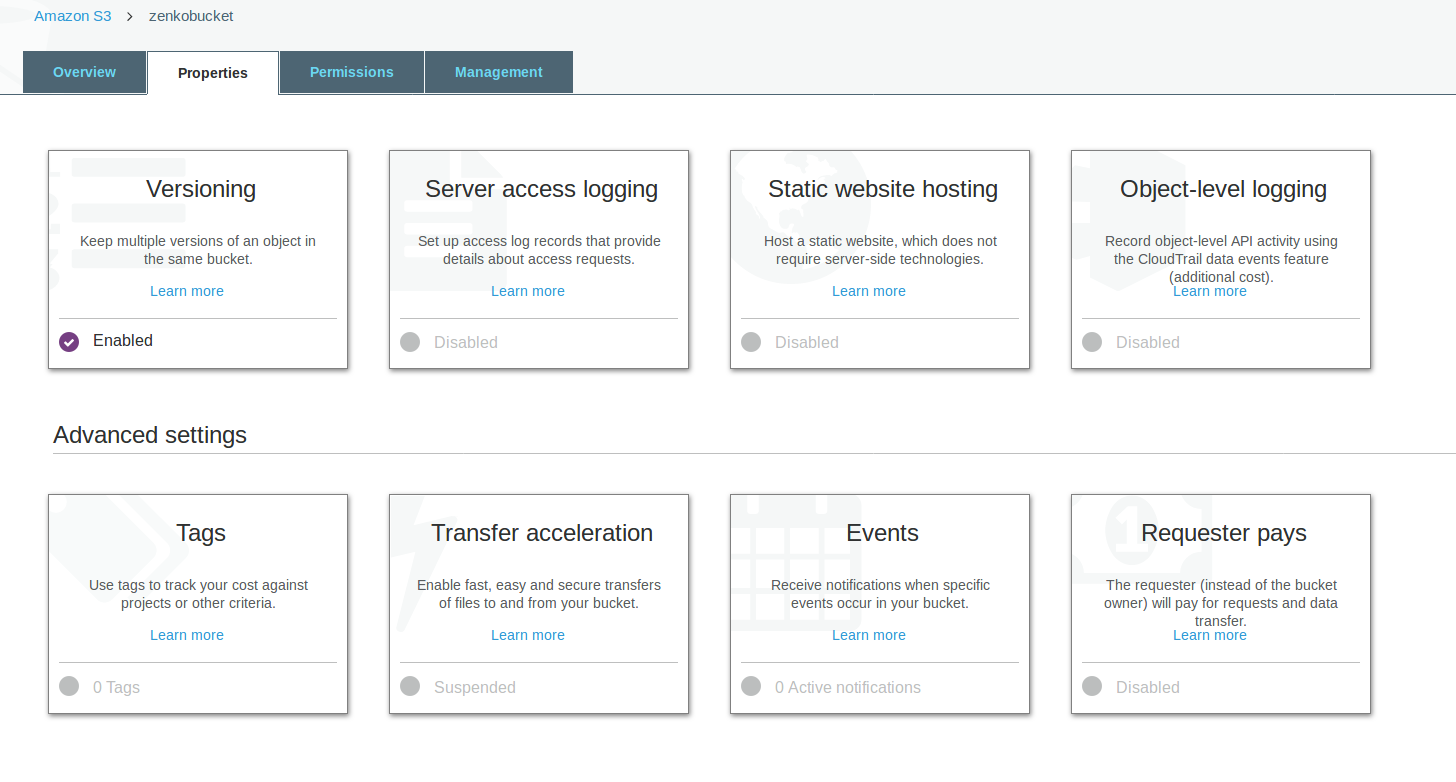
Make sure versioning is enabled in your remote AWS S3 hosted bucket. To check, using the AWS Console, click on your bucket name, then on “Properties” at the top, and then you should see something like this:
Microsoft Azure as a data backend
From the MS Azure Console
From your Storage Account dashboard, create a container where you will host your data for this new location constraint.
You will also need to get one of your Storage Account Access Keys, and to provide it to CloudServer. This can be found from your Storage Account dashboard, under “Settings, then “Access keys”.
In this example, our container will be named zenkontainer, and will belong
to the zenkomeetups Storage Account.
From the CloudServer repository
locationConfig.json
Edit this file to add a new location constraint. This location constraint will contain the information for the MS Azure container to which you will be writing your data whenever you create a CloudServer bucket in this location. There are a few configurable options here:
type: set toazureto indicate this location constraint is writing data to MS Azure;legacyAwsBehavior: set totrueto indicate this region should behave like AWS S3us-east-1region, set tofalseto indicate this region should behave like any other AWS S3 region (in the case of MS Azure hosted data, this is mostly relevant for the format of errors);azureStorageEndpoint: set to your storage account’s endpoint, usuallyhttps://{{storageAccountName}}.blob.core.windows.net;azureContainerName: set to an existing container in your MS Azure storage account; this is the container in which your data will be stored for this location constraint;bucketMatch: set totrueif you want your object name to be the same in your local bucket and your MS Azure container; set tofalseif you want your object name to be of the form{{localBucketName}}/{{objectname}}in your MS Azure container ;azureStorageAccountName: the MS Azure Storage Account to which your container belongs;azureStorageAccessKey: one of the Access Keys associated to the above defined MS Azure Storage Account.
(...)
"azure-test": {
    "type": "azure",
    "legacyAwsBehavior": false,
    "details": {
      "azureStorageEndpoint": "https://zenkomeetups.blob.core.windows.net/",
      "bucketMatch": true,
      "azureContainerName": "zenkontainer",
      "azureStorageAccountName": "zenkomeetups",
      "azureStorageAccessKey": "auhyDo8izbuU4aZGdhxnWh0ODKFP3IWjsN1UfFaoqFbnYzPj9bxeCVAzTIcgzdgqomDKx6QS+8ov8PYCON0Nxw=="
    }
},
(...)
Warning
If you set bucketMatch to true, we strongly advise that you
only have one local bucket per MS Azure location.
Without bucketMatch set to false, your object names in your
MS Azure container will not be prefixed with your Cloud Server bucket name.
This means that if you put an object foo to your CloudServer bucket
zenko1 and you then put a different foo to your CloudServer
bucket zenko2 and both zenko1 and zenko2 point to the
same MS Azure container, the second foo will overwrite the first
foo.
Tip
You may export environment variables to override some of your
locationConfig.json variable ; the syntax for them is
{{region-name}}_{{ENV_VAR_NAME}}; currently, the available variables
are those shown below, with the values used in the current example:
$> export azure-test_AZURE_STORAGE_ACCOUNT_NAME="zenkomeetups"
$> export azure-test_AZURE_STORAGE_ACCESS_KEY="auhyDo8izbuU4aZGdhxnWh0ODKFP3IWjsN1UfFaoqFbnYzPj9bxeCVAzTIcgzdgqomDKx6QS+8ov8PYCON0Nxw=="
$> export azure-test_AZURE_STORAGE_ENDPOINT="https://zenkomeetups.blob.core.windows.net/"
Start the server with the ability to write to MS Azure
Inside the repository, once all the files have been edited, you should be able to start the server and start writing data to MS Azure through CloudServer.
# Start the server locally
$> S3DATA=multiple yarn start
Run the server as a docker container with the ability to write to MS Azure
Mount all the files that have been edited to override defaults, and do a standard Docker run; then you can start writing data to MS Azure through CloudServer.
# Start the server in a Docker container
$> sudo docker run -d --name CloudServer \
-v $(pwd)/data:/usr/src/app/localData \
-v $(pwd)/metadata:/usr/src/app/localMetadata \
-v $(pwd)/locationConfig.json:/usr/src/app/locationConfig.json \
-v $(pwd)/conf/authdata.json:/usr/src/app/conf/authdata.json \
-e S3DATA=multiple -e ENDPOINT=http://localhost -p 8000:8000
-d scality/cloudserver
Testing: put an object to MS Azure using CloudServer
In order to start testing pushing to MS Azure, you will need to create a local
bucket in the MS Azure region - this local bucket will only store the metadata
locally, while both the data and any user metadata (x-amz-meta headers
sent with a PUT object, and tags) will be stored on MS Azure.
This example is based on all our previous steps.
# Create a local bucket storing data in MS Azure
$> s3cmd --host=127.0.0.1:8000 mb s3://zenkontainer --region=azure-test
# Put an object to MS Azure, and store the metadata locally
$> s3cmd --host=127.0.0.1:8000 put /etc/hosts s3://zenkontainer/testput
 upload: '/etc/hosts' -> 's3://zenkontainer/testput'  [1 of 1]
  330 of 330   100% in    0s   380.87 B/s  done
# List locally to check you have the metadata
$> s3cmd --host=127.0.0.1:8000 ls s3://zenkobucket
 2017-10-24 14:38       330   s3://zenkontainer/testput
Then, from the MS Azure Console, if you go into your container, you should see your newly uploaded object:

Troubleshooting
Make sure your ~/.s3cfg file has credentials matching your local
CloudServer credentials defined in conf/authdata.json. By default, the
access key is accessKey1 and the secret key is verySecretKey1.
For more informations, refer to our template ~/.s3cfg .
Pre-existing objects in your MS Azure container can unfortunately not be accessed by CloudServer at this time.
For any data backend
From the CloudServer repository
config.json
Important
You only need to follow this section if you want to define a given location as the default for a specific endpoint
Edit the restEndpoint section of your config.json file to add
an endpoint definition matching the location you want to use as a default for an
endpoint to this specific endpoint.
In this example, we’ll make custom-location our default location for the
endpoint zenkotos3.com:
(...)
"restEndpoints": {
    "localhost": "us-east-1",
    "127.0.0.1": "us-east-1",
    "cloudserver-front": "us-east-1",
    "s3.docker.test": "us-east-1",
    "127.0.0.2": "us-east-1",
    "zenkotos3.com": "custom-location"
},
(...)